Create System Restore Points automatically every day or week
I wish Windows had an inbuilt feature or setting, where users could easily set their PC to create restore points, daily or weekly easily with a click – but there is no such setting available. You will have to use the Task Scheduler to get this done. Now let us see how to schedule one at a particular time. It is a 3-step process: We have also talked about how to manually run the task to confirm its working and a quick tutorial to create a shortcut to that task. It will let you create Restore point quickly.
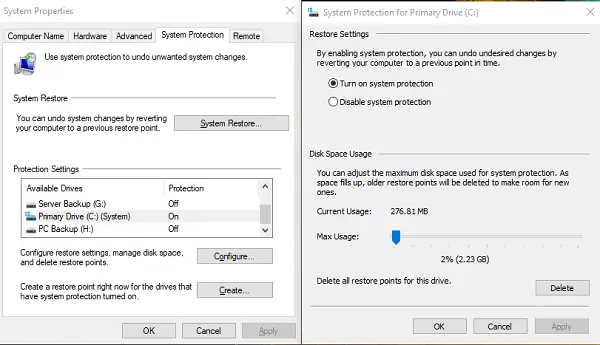
1] Enable System Restore Feature
While it should on by default, but it’s a good idea to check if it System Restore has been disabled. You will also have to configure System Restore for the individual drive, including the disk usage option. Windows allows one to create System Restore only once in 24 hours. If it makes another attempt, it will skip. So, if you are planning to create multiple restore points, sometimes manually, then we need to remove this limitation. Open Registry Editor and navigate to the following key: Double click to edit SystemRestorePointCreationFrequency DWORD. Modify the value to 0.
This will make sure that Windows doesn’t skip creating a restore point ever.
2] System Restore Point Command
The command which we will use to create the restore point is You may change the name TWC-RestorePoint to anything else. MODIFY_SETTINGS is a type of Restore point which includes Registry, local profiles, com+ DB, WFP.dll, IIS database, and file extensions. I would recommend you execute this command on PowerShell to make sure it works properly. Here is a quick demo of the command we suggested. Notice that it created a restore point with the description — TWC-RestorePoint.
Apart from this, you can also use the following arguments:
APPLICATION_INSTALLAPPLICATION_UNINSTALLDEVICE_DRIVER_INSTALLCANCELLED_OPERATION
You can also use the following argument with WMIC.EXE to create a restore point. We have explained this in detail in our post on How to automatically create a restore point with Windows Startup.
3] Create Task Scheduler
Now you will have to create & schedule a basic task and use the command mentioned above in the task scheduler with PowerShell Type taskschd.msc in the Run prompt and hit the Enter key to open the Task Scheduler. Click on the Create Task link. Name it as Restore Point Creator, and check the box which says Run with highest privileges.
If there are multiple users on the computer, select the radio button which says Run whether the user is logged on or not. Switch to Triggers tab, and click on the New Button. Here we will schedule the task to run once every day, or you can choose anything else you wish. Select daily, set the start date, and time.
Switch to Actions Tab, and click on the New Button. Here we will add the command. Type powershell.exe in the Program/script box. In the Argument box type the following: Click on the OK button.
Next, switch to the Conditions tab if you are configuring this on a laptop. You can choose to skip creating a restore point if it is running on battery or stop if it switches to battery. Lastly, switch to the Settings tab. Here you should configure on what happens if the task fails or if it misses as the computer was off. It can also take care of the situations in case the task fails, and so on. If you have configured it to run even when the user is not logged in, you will be prompted to enter the password. If you are using a Microsoft account, then I will suggest that you create a local admin account, and use it for such settings where a password is needed.
Manually run the Task to check if it works
Select the task we created, and on the right panel, click on the Run button. It will instantly launch PowerShell and execute the command. Read: How to create a System Restore desktop shortcut.
Create a Shortcut for the System Restore Task to run it anytime
The program, schtasks.exe, is responsible for executing the tasks when its time. We can use the following argument to create a desktop shortcut to run it on demand. In our case, it will look like this:
Right-click on the desktopSelect New > ShortcutIn the location, paste the above-stated commandGive it a name, and click OK.
Now the next time you change something which can use an issue, create a restore using this shortcut. In this, not only we have learned to schedule System Restore Points in Windows 10 but also create it anytime want using the shortcut. Do remember that every time you create a restore point, it will occupy part of the storage space. While Windows will automatically delete old restore points when the allocated disk space limit is reached, you can also delete older restore points manually.