Though select items, invert selected items, and clear all the selection options are present in the Ribbon menu of Windows 10 and See more section of Windows 11 File Explorer and one can also use associated hotkeys for these actions, those who want to use all such options from the right-click context menu of their Windows 11/10 computer, this trick is helpful.
How to add Select Context Menu in Windows 11/10
Before adding the Select menu to right-click context menu of your Windows 11/10 computer, you should create a system restore point or backup Registry. It is because this trick requires Registry tweaks. If you face some trouble after using the trick, you can undo the changes easily. Now follow these steps:
Open Registry EditorAccess shell key present under the main HKEY_CLASSES_ROOT Registry keyCreate a Select Registry key under the shell keyUnder the Select key, create three different String values:iconMUIVerbSubCommandsAdd value data for String valuesRestart File Explorer.
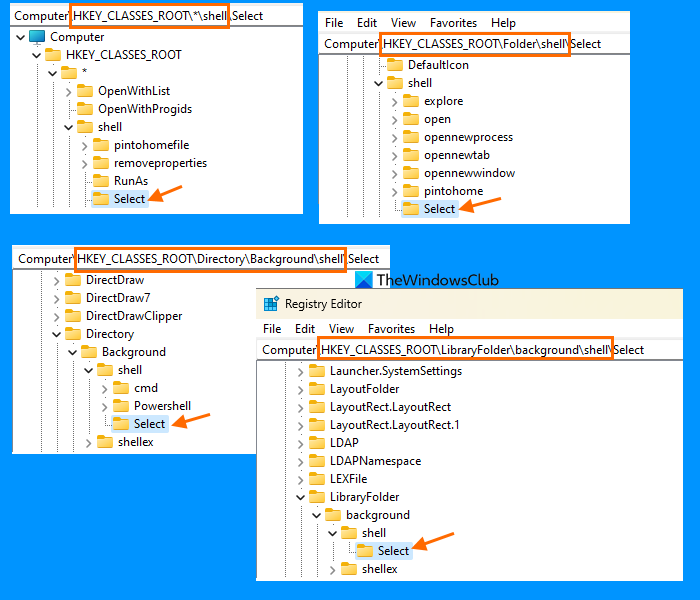
Let’s check all these steps in detail. Type regedit in the Search box and hit the Enter key to open the Registry Editor window. Access the shell key present in the four different locations. The paths to access shell Registry keys are: Under each shell key, create a new Registry key one by one. After that, add Select as the new name for those Registry keys.
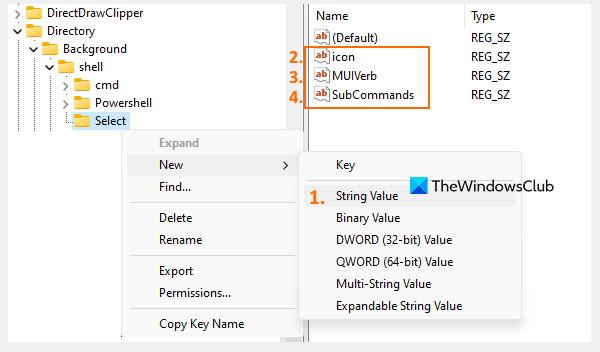
Now, one by one, create three different string values named icon, MUIVerb, and SubCommands under the Select Registry key for each location.
Here is an example. To create a string value in HKEY_CLASSES_ROOT*\shell\Select path, you need to right-click on the Select key, access the New menu, and click on String Value, as visible in the image above. When the new value is added, rename it as icon. In the same way, create two more String values, and rename them to MUIVerb and SubCommands. You have to do this for all the other three paths mentioned above. Once the String values are created, set the Value data for each String value. First, double-click on the icon String value, and an Edit String box will pop up. In that box, add imageres.dll,-5308 in the Value data field, and press the OK button.
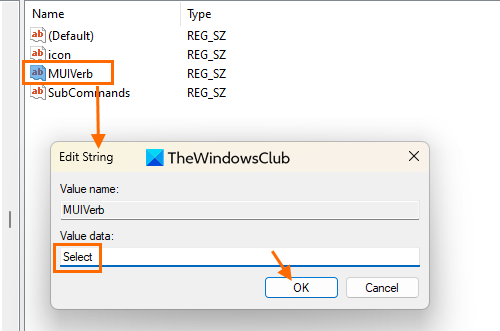
Now open the Edit String box of MUIVerb value and add Select in its Value data field. Press the OK button.
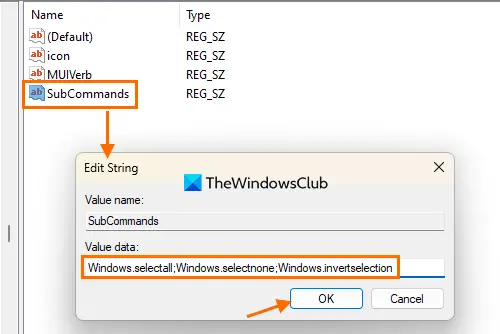
Finally, open the Edit String box of SubCommands String value and add the following path to the Value data field:
Press the OK button. When you have filled the Value data of all String values present in the Select key of all the four locations, close the Registry Editor, and restart File Explorer (if needed). Now, when you select some item or right-click on an empty area on the desktop or a folder in the File Explorer, you will see the Select context menu. Accessing that menu will show Select none, Select all, and Invert selection options that you can use as per your needs. In case you want to remove the Select context menu from the right-click menu of Windows 11/10, you can do it easily. All you have to do is open the Registry Editor window and remove or delete the Select Registry key created by you from all the paths. Restart File Explorer if needed and the Select context menu will be removed. Hope this is helpful.
How do I add the context menu in Windows 10?
If you want to add new items to the context menu in Windows 11 or Windows 10, then you can do this using some third-party tools. There exist some free context menu editors to add, remove, and edit context menu items in Windows 11/10. You will have the option to select only those items that you want to add in the right-click context menu.
How do I add options to the context menu?
If you want to edit or add items to the New context menu in your Windows 11/10 computer, then you can either take the help of the Registry Editor feature or use a free third-party tool that lets you customize the New context menu. You will also be able to restore and delete/remove added items when you don’t want to use them. Read next: How to get Old Right-Click Context Menu back on Windows 11.


![]()

