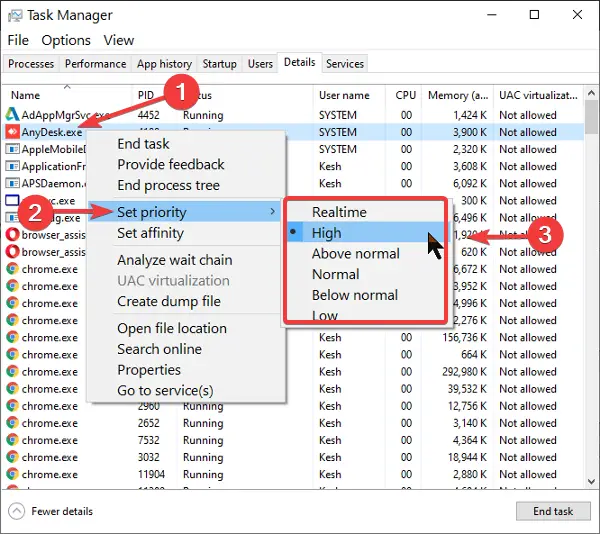
The higher the priority level, the more resources Windows reserves for the program. Although not advisable, increasing the priority level is a temporary solution that works for most users. However, in some cases, when you try to change the Process Priority in Task Manager, it fails, and you get the error that says Access denied. If you experience this on a specific process, then it is an issue stems from the program in question, and you can’t fix that (for the good of your computer). On the other hand, if you can’t set the priority level of multiple processes, read this guide to the end to learn how to repair the issue and force your computer to let you change process priority levels.
Can’t set Process Priority in Task Manager of Windows 11/10
If your Windows system doesn’t let you change the priority levels of programs using Task Manager, below are the troubleshooting steps to fix the issue. By the third step, you should have resolved the challenge. If you’re not sure how to apply the fixes above, then continue reading this guide as I explain them in detail.
1] Disable/Enable User Access Control (UAC)
User Access Control protects your computer system from potential damage that can arise from applications you install. It comes into play when you attempt to install risky programs or modify your system in harmful ways. The settings can be applied to Administrator accounts as well as Standard User Accounts. Note that Administrator and Standard User Accounts have access to the same functionality, but the latter is limited by permissions. If you can’t set the Process Priority in Task Manager in Windows 10, reducing or increasing your UAC settings can fix the issue. Here’s how to do it. Open the Run dialog box using the Windows key + R combination and enter control nusrmgr.cpl. Click on the OK button to open the User Accounts window. Click on the Change User Account Control settings link and accept to run it as an administrator if prompted. Click and drag the slider all the way down towards the Never notify area. The lower the slider, the less Windows notifies you when your programs try to install software or modify your system. Hit the OK button to save the settings and close the window. Finally, restart your PC and try to set priority for processes in Task Manager to see if your computer now lets you do it. If you are still unable to set process priority in Task Manager after this setting, follow the above steps again. However, instead of dragging the slider down, raise it toward the Always notify area. Once you are able to make the change, remember to set the UAC settings back to its default value.
2] Acquire the relevant admin permissions
You need to have all the administrative privileges on your system. If the user account you are logged in isn’t an administrator, you have to give yourself permission to be able to set process priority – or ask an admin to do it for you. Reboot your machine finally.
3] Boot your computer into Safe Mode
As with many (if not all) Windows problems, booting your computer into Safe Mode will fix this issue. The Windows Safe Mode enables your machine to start up with only the vital programs and drivers. To boot your computer into Safe Mode, first power it off. Turn your computer back on, and before it boots up, press the F8 key. This brings up the Advanced Boot Options screen. Using the directional keys on your keyboard, navigate to Safe Mode and hit ENTER. In Safe Mode, open Task Manager and try to set the process priority again to see if it works.
If it does, then restart your computer and try it again. It should work flawlessly this time around. Hopefully, one of these three fixes will get you right back on track, and Task Manager will now let you set the process priority levels.